In this tutorial, you will learn how to produce high-quality HDRI maps essential for 3D projects. It is necessary to have access to a powerful PC with decent Nvidia GPU and CPU, fast drives and more than 16GB of ram and of course some basic knowledge of photography.
1. Gather all equipment:
a) You will need a proper DSLR camera with a cropped or full-frame sensor. You can acquire the cheapest and used ones, such as an old Canon 60D, for less than 200 USD/EUR. This older camera cannot perform advanced bracketing, so you will need to install alternative firmware on your camera called Magic Lantern. Installing Magic Lantern on some Canon cameras enables you to shoot 7 x 2 EV bracketed shots, and thanks to additional functionalities, use your old Canon DSLR as a videographer.
Acquire any camera with a cropped or full-frame sensor capable of 7 x 2 EV. For any modern full-frame camera that can produce RAW files with a high dynamic range and resolution, such as the Nikon D810 or Sony Alpha III, capturing 5 shots each 3 EV apart (-6EV, -3EV, 0, +3EV, +6EV) is sufficient. Before purchasing your new camera, read and search the camera’s user manual, and check the exposure bracketing specifications – you aim to capture as much dynamic range as possible to produce high-quality HDRIs!
| List of suggested cameras (this list will be updated): |
|---|
| List of Canon DSLRs that allow to shoot properly hdri maps: 60D + Magic Lantern, 70D, 80D, 7D + Magic Lantern, 7D mark II, 6D, 6D Mark II, EOS R, 5D Mark III, 5D Mark IV, 5Ds and all cameras of 1D series |
| Recommended Nikon DSLRs: Nikon 7500 (7x2EV), D500 (7x2EV), Nikon D750 (7x2EV), D800 (5x3EV or 7x2EV with external controller Promote Control), D810 (5x3EV), D850 (5x3EV), Nikon D5 (5x3EV or 7x2EV) |
| Mirrorless Nikon full-frame cameras: Nikon Z5 (5x3EV or 2x7EV), Nikon Z6 (5x3EV or 2x7EV), Nikon Z7 (5x3EV or 2x7EV), Nikon Z7 II (5x3EV or 2x7EV) |
| Sony mirrorless full-frame cameras: Sony Alpha A7II (5x3EV), Sony Alpha A7III (5x3EV), Sony Alpha A7IV (5x3EV) |
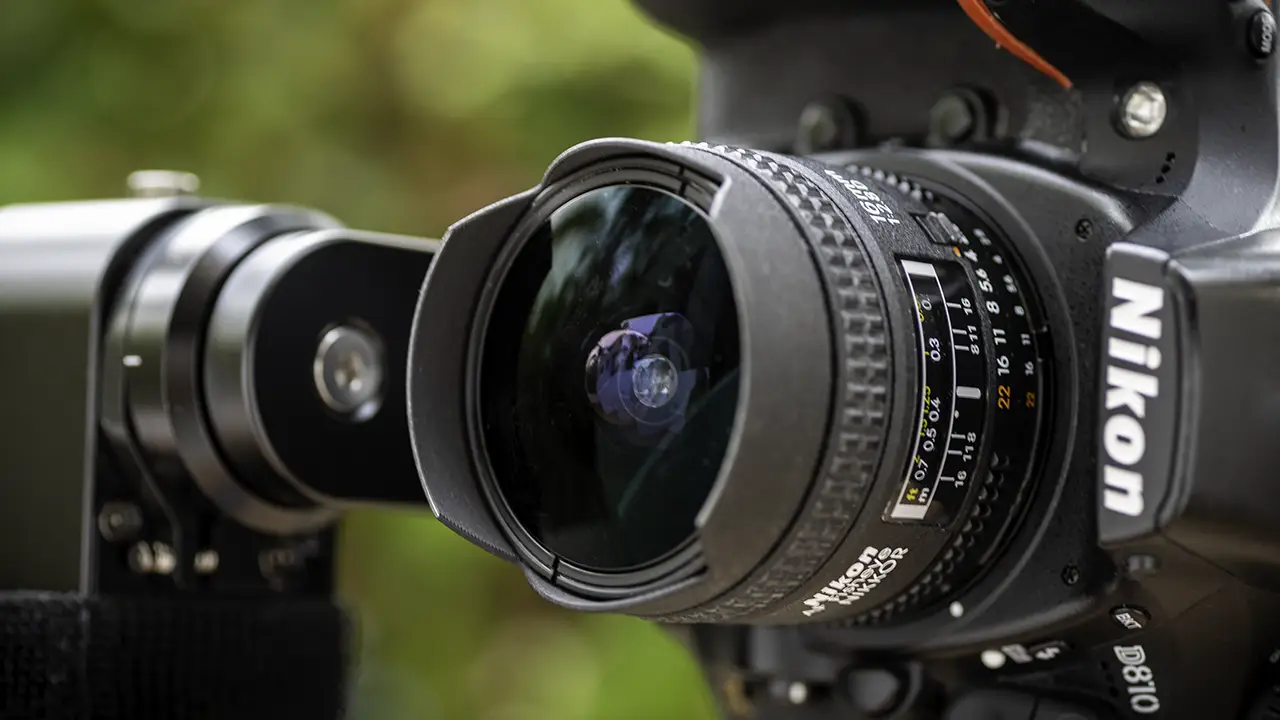
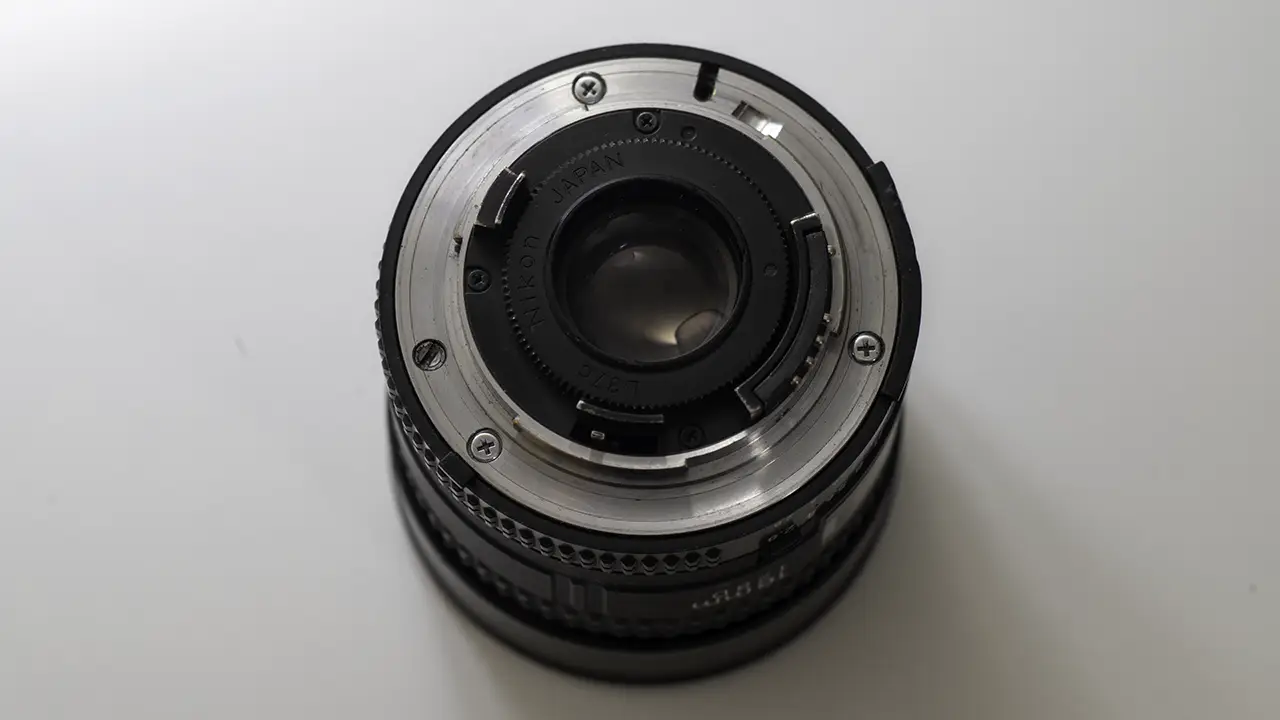
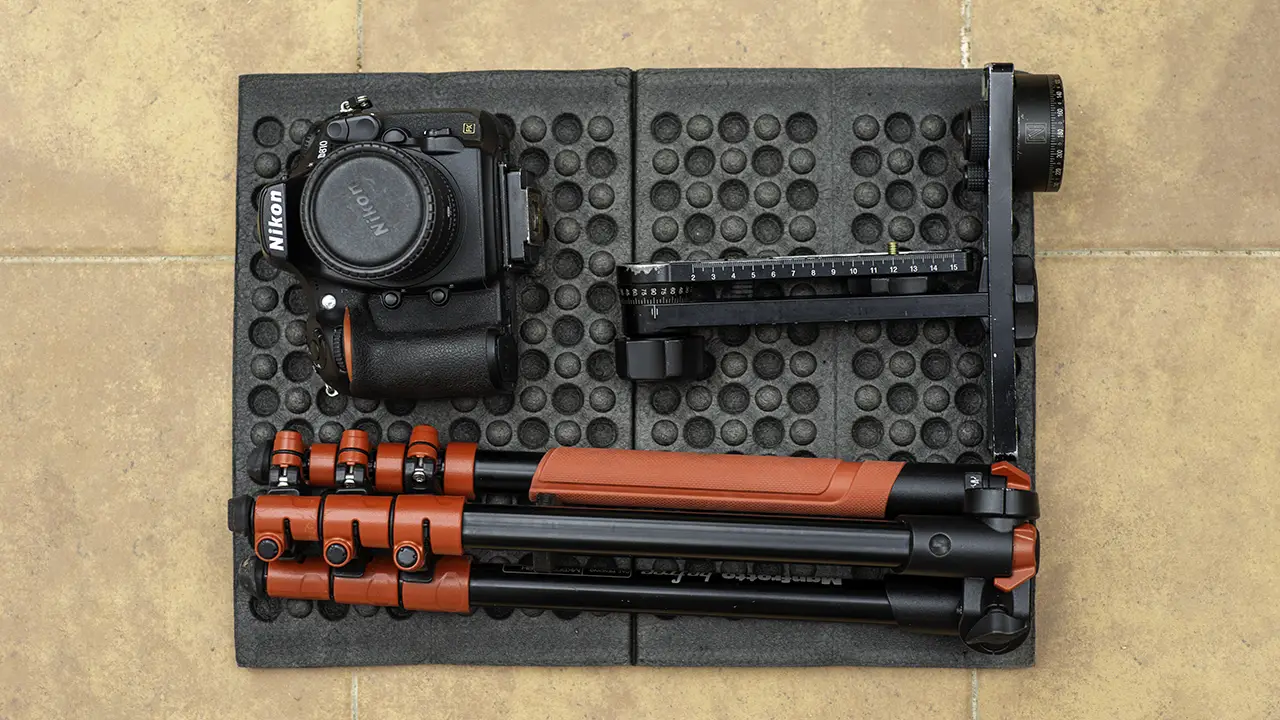
b) Obtain a Fisheye lens if you want to shoot fast; the most affordable one is the Samyang 8mm f/3.5 Fisheye (in USA also known as Rokinon). I found a second-hand one with a Nikon mount for 99 USD/EUR on Google’s first listing while in Spain. If you are a fan of Canon, Nikon, or Sony camera systems, you might prefer a quality prime lens like the AF Fisheye Nikkor 16mm f/2.8D or Canon EF 8-15mm f/4 L USM Fisheye. I found a used one in good condition for 230 USD/EUR, or a heavily used one for 164 USD/EUR. But if you want to go PRO avoid fish-eye lenses and shoot with ultra wide lens. Why? Because you will achieve better optical resolution with quality Rectilinear Lens, and such lenses are less tend to the flare problem.
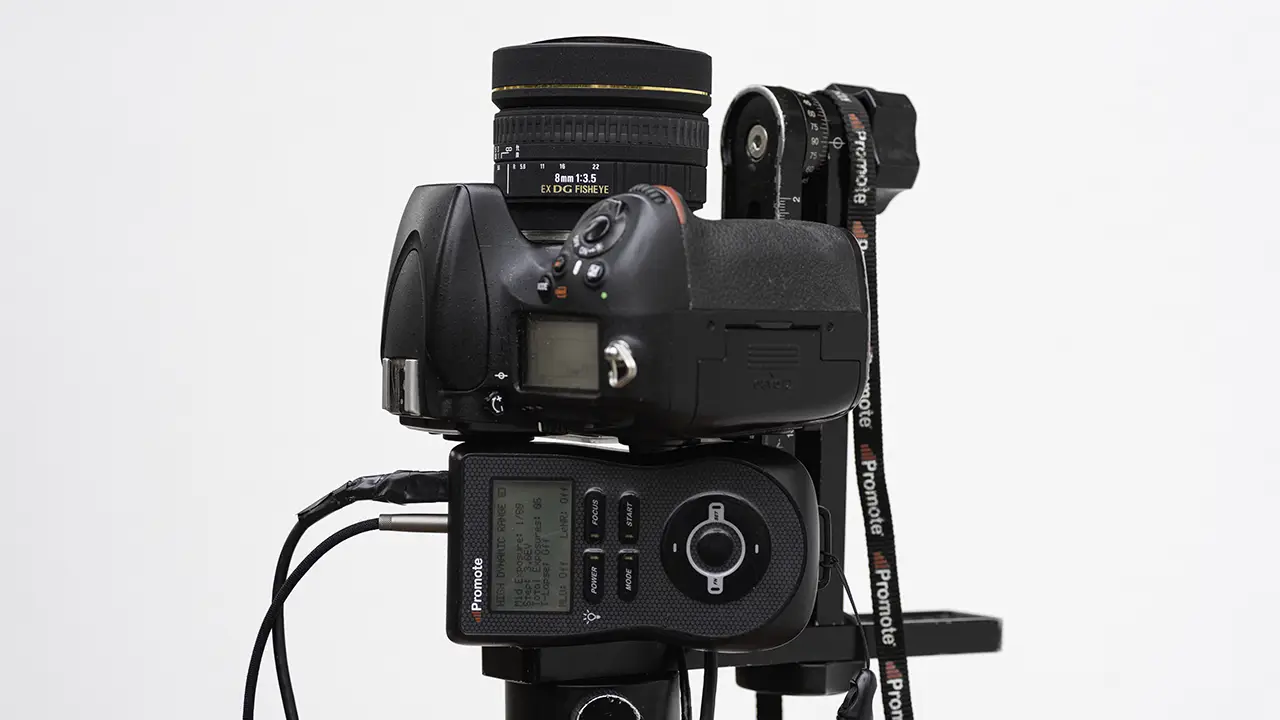
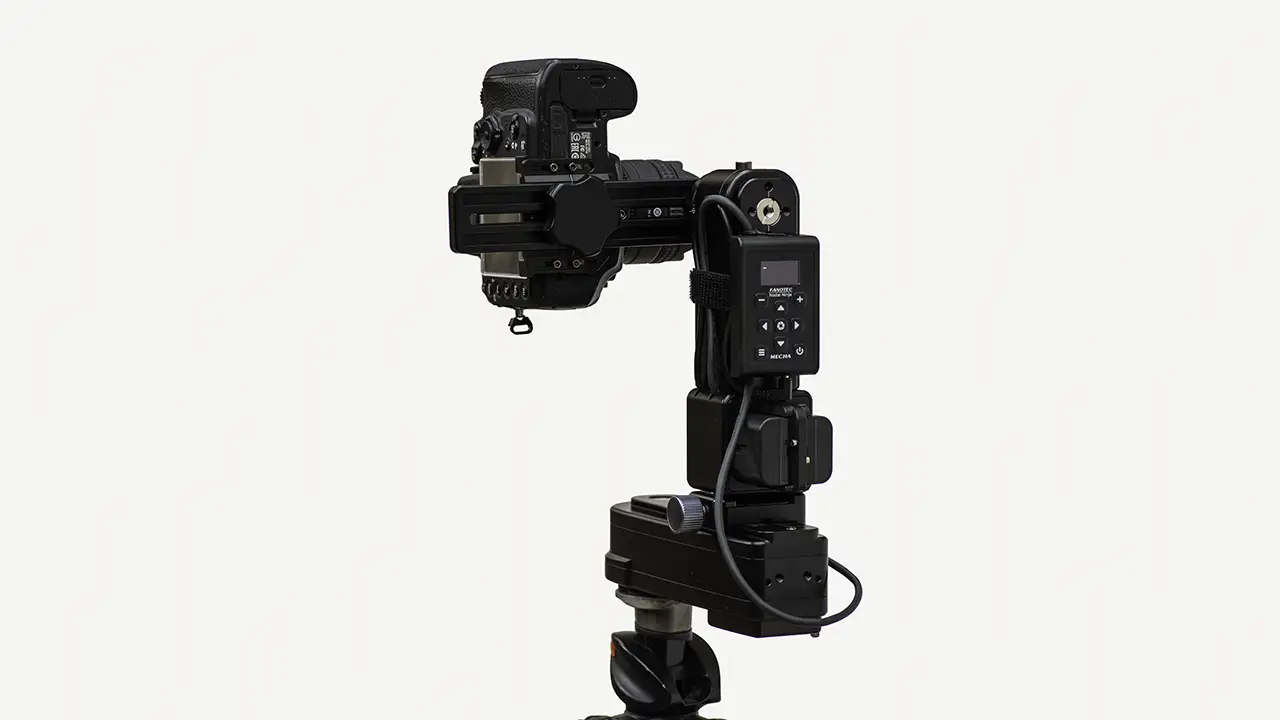
c) Search online for an appropriate panoramic head. I have been a long-time user of Fanotec’s Nodal Ninja panoramic heads, and they are highly reliable. If your camera has a cropped sensor (like the Canon 60D), you might want to consider the most affordable option, the Nodal Ninja 3 MKII Starter Package, available for 66 USD/EUR at panosociety.com. However, for any full-frame camera, I would recommend getting a brand-new Nodal Ninja 6 or looking for a second-hand Nodal Ninja 5 or Nodal Ninja 4. I couldn’t find any available in the EU market on eBay, so I searched through the local Polish Craigslist and found NN5 pano head in mint condition for 90 USD/EUR.
If you plan to purchase a panoramic head, check the maximum weight it can support and what types of cameras and lenses it is compatible with. You should also examine the vertical rail scale and compare it to the entrance pupil distance. You can find measurements for some popular cameras and lenses in the Entrance Pupil Database. Use these measurements for mounting your camera on the panoramic head later on.
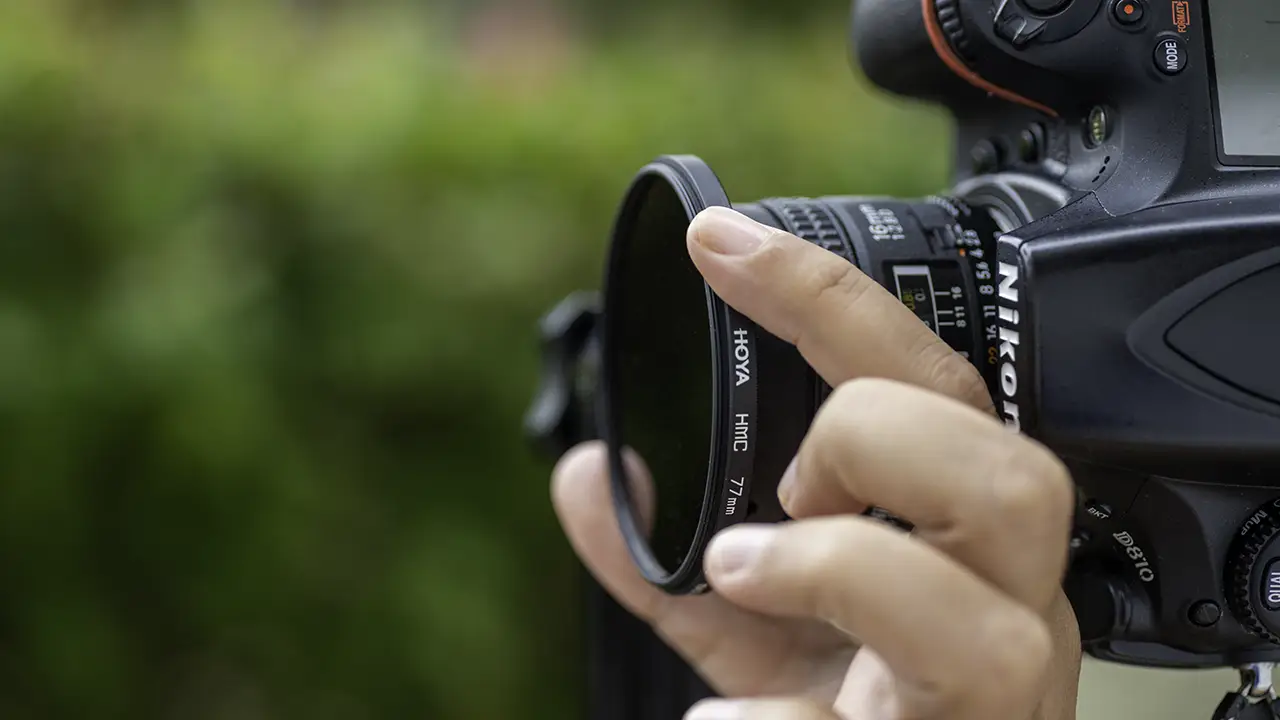
d) If you want to properly capture sunlight in HDR, you should get a Neutral Density (ND) filter. Which one? ND400 (9 stops) or ND1000 (10 stops) if you are living in the north and it’s winter, ND4000 (12EV) if it’s sunny summer time and sun shine is really strong. Don’t forget that you can always stack few ND filters to get even darker frames. Fisheye lenses typically cannot mount ND filters due to the lack of a filter thread, but some, like the Nikkor 16mm f/2.8D, allow the placement of a gel filter in the rear filter slot (mounted between the lens and camera body). If you decide to use gel filters, opt for the Kodak Wratten 2 neutral density gel filter. Keep in mind that these filters often have misleading markings on the packaging: for example, Kodak Wratten 2 ND 3.0 is a 10-stop filter, and Kodak Wratten 2 ND 4.0 provides 13-2/3 stops. Learn more about this here.
The issue with mounting a gel filter in the rear slot is that you have to remove the lens from your camera to attach the filter. Gel filters are also highly sensitive to dust and greasy fingerprints, which is too much hassle for me, especially when shooting outdoors on a windy day. There’s an easier way to use an ND filter with fisheye or other wide-angle lenses that lack a filter thread: acquire a regular screw-on ND filter in a larger size, at least 77mm, and simply hold it firmly over the front of the lens. Alternatively, you could construct a DIY filter holder from cardboard; learn more from YouTube video.
e) The last piece of equipment you’ll need is, of course, a tripod. If you plan to shoot in open spaces under windy conditions or at night, you should opt for one that’s heavier rather than lighter. Lightweight tripods, like the compact Manfrotto Befree, are easy to pack inside a backpack and weigh no more than 1kg without the head. This kind of tripod is what I usually take when I plan to camp overnight in nature, far from civilization. However, for shooting HDRI skies, which typically occurs in open, windy fields, I’d rather use my Manfrotto MN055XPROB, which weighs 2.4kg and has a maximum height of 179 cm. Before you purchase a tripod, ensure that its load capacity is at least twice the total weight of your equipment.
2. Finding location and hdri shooting
a) The easiest way to find a suitable spot for HDRI shooting is to search using Google Maps, Mapy.cz, and Google Street View. Look for a location where there are no people around at the given time and where there is ample space to shoot a spherical panorama easily. If you aim to shoot HDRI skies, try to find a place free of buildings, mountains, or tall trees. Don’t forget to check the weather forecast!
b) Before you start shooting, ensure that your panoramic head is calibrated. It’s essential to calibrate the panoramic head to locate the no-parallax point (also known as the nodal point). Calibrating a panoramic head is crucial as it eliminates parallax errors, enhances stitching accuracy, reduces post-processing time, and ensures consistent results. The good news is that you only need to do this once for each camera and lens pair. Learn more about how to calibrate a panoramic head on YouTube. Alternatively, you can use calibration data from the Entrance Pupil Database.
c) Correctly placing a photo tripod is crucial for achieving stable and sharp photographs. Avoid placing the tripod on uneven ground or surfaces that might shift. Extend the tripod legs and spread them out evenly to maximize stability. Ensure all the leg locks are securely tightened. Here’s a little trick: when placing a tripod in full sunlight, you can align the shadow of one leg with another (shadow over shadow), thereby reducing the amount of work needed during the editing process.
d) Attach the panoramic head to the tripod, and then mount the camera in the portrait orientation onto the panoramic head using calibration data. Utilize the spirit level attached to the pano head to level your setup. Most panoramic heads feature adjustable rotators with a positive detent click. To cover 360 degrees with a fisheye lens, you’ll need 6 photos around, plus a zenith (top) and nadir (bottom) shot. Refer to the user manual of your panoramic head to learn more. It’s recommended to always position your camera opposite the sun, so the first shot at 0° will include the sun. This helps you remember where you started, and also allows you to capture that extra sequence with an ND filter before the clouds cover the sun! Sometimes the sky changes very quickly, so you need to think and act swiftly!
e) Prepare your camera for HDRI shooting. Set the camera to RAW 14-bit format (never use JPEGs!), switch to Manual mode (M), and turn off Auto-Focus. Adjust the aperture to the sharpest setting available; for my Nikkor 16mm fisheye, it is around f/10 (you should check the specifications of your lens online).
Use the lowest ISO available. Manually focus at the hyperfocal distance, which for a fisheye lens is around 1.5 meters. Choose the appropriate bracketing mode, typically 7 x 2 EV or 5 x 3 EV. When I shoot sunlight HDRIs with my Nikon D810, I set the camera to ISO 32, shutter speed to 1/125 s, so all 5 brackets, which are 3EV apart, are shot at speeds: 1/8000 (-6 EV), 1/1000 (-3 EV), 1/125, 1/15 (+3 EV), and 0.5 s (+6 EV).
For shooting sunlight HDRIs, you must use the fastest shutter speed available (the darkest shot should be 1/8000 or faster) and set the ISO to the lowest value your camera allows. This approach is used because we aim to capture the sun as a very small dot, making the HDRI more or less unclipped. Theoretically, we could close the lens aperture to f/22, but due to the issue of lens diffraction, we avoid this to prevent sacrificing image sharpness. Hence, taking an extra shot of the sun with a very dense Neutral Density filter (9 or 10 stops) at f/8 or f/10 (optimal sharpness for the Nikkor 16/2.8 fisheye) can be beneficial.
Don’t forget to cover the camera viewfinder to prevent any stray light from entering. I hope you’ve left your camera’s strap at home; it’s completely useless when shooting HDRI maps!
f) It’s time for shooting! Use a delayed shutter release or a release cable to activate the camera shutter. Keep your distance from the camera, bending down or even lying on the ground to avoid casting any shadows that are visible in the frame. Take shots in the first position with ND filter (lens against sun), then continue without filter. Rotate the camera on the panoramic head as needed (with fish-eye lens it is every 60 degrees). Ensure that the panoramic head is secure and well-balanced. Remember to capture the zenith (top) and nadir (bottom) of the spherical panorama. Consider taking an extra nadir shot to later mask the tripod and panoramic head – simply move away 30-50 cm and rotate the panoramic head 10 or 15 degrees horizontally. Take in and enjoy the surrounding environment – polarizing glasses are your best friend!
3. Processing images with computer
To process high-resolution HDRI maps, you need a powerful computer and potentially expensive software. While some software can be substituted with free alternatives, others cannot and may be quite costly. Most of the software packages mentioned here are compatible with Windows and Mac. Linux users can find replacements for Adobe’s Lightroom and Photoshop with free alternatives.
All required software includes:
- PTGui Pro (345€ + VAT, Windows, Mac, and Linux): You essentially cannot create HDRI maps without PTGui. It is the sole HDRI panorama stitching software that performs as expected. I have tried alternatives like the free Hugin or copyleft Autopano Giga. You can try to stitch hdr panorama in Autopano Giga, you should get a decent results. Learn more about stitching hdris in Autopano Giga. But if you want to be pro and don’t waste your time get PTGui Pro . Although the PTGui Pro license is expensive, it’s a long-term investment, offering a perpetual license. You can later upgrade it at a discounted price if needed; all minor updates are free, and any major upgrades within 1 year are also free. Remember, to efficiently process high-resolution HDRI maps, a decent Nvidia GPU card with 12 GB of VRAM or more is recommended. It’s not mandatory, but it will significantly enhance your workflow and processing speed. Fast SSDs (at least two) and a powerful CPU are crucial for optimal performance in PTGui.
- Adobe Lightroom Classic (~10 USD/EUR per month, Windows and Mac) or consider alternatives like Capture One Pro (349 USD/EURO), DxO PhotoLab (229 USD/EUR), Darktable (Free), or RawTherapee (Free). I recommend the Adobe Photographer subscription, which includes both Adobe Lightroom and Photoshop, as it offers the best value.
- Adobe Photoshop (~10 USD/EUR per month, Windows and Mac), or explore alternatives for HDRI file editing such as Affinity Photo (75€) or Gimp (free). However, be aware that the Content Aware Fill feature is unique to Photoshop, so if you choose an alternative, you may have to make do with the more cumbersome stamp tool. This might not be a significant issue for some, but I prefer Adobe Photoshop.
Pano2VR (free trial, Windows and Mac): I use this software to patch the nadir. You don’t need to purchase the license (449 USD/EUR + VAT); I tested the latest version, Pano2VR 7.0.9, and it didn’t meet my expectations, so I suggest downloading and installing the older, more simplified version 4.5.3 from the provided link. It is available for Windows, Mac, and Linux. Be aware if you work with 32-bit OpenEXR files, as this program strips data to 16-bit semi float .exr!
Use Affinity Photo instead or if you want to patch nadir in Photoshop use Exr-IO and Flexify 2 plugins.
Once you have collected and installed all the required software, it’s time to start working with the photos.
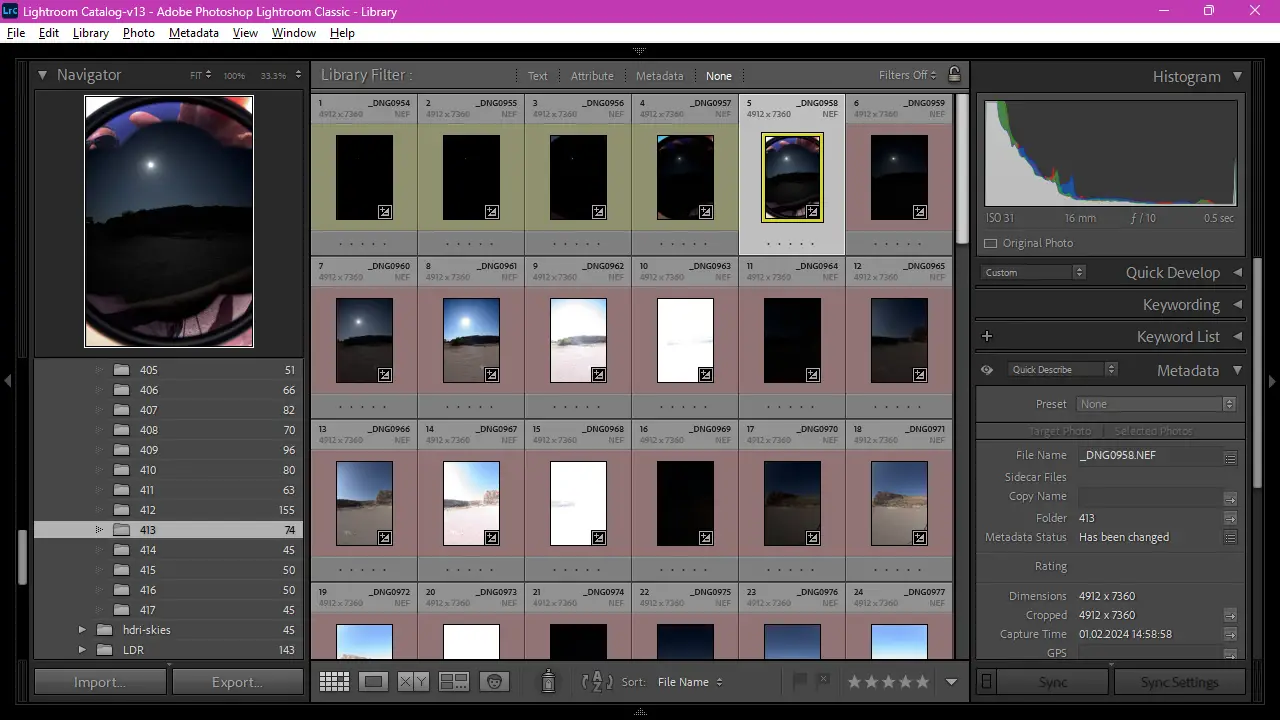
a) Import the photos to your PC, organize each HDRI set into separate folders, or use color labels in your RAW developing software. Ensure that you are not missing any shots and that the images are not blurred. If you have captured extra shots with an ND filter, use a different label color to distinguish them from the other photos (yellow is the color of the sun).
b) Set the white balance. Choose a representative photo, one that appears the most natural, and use its WB value as a custom value or simply opt for the Daylight preset for daylight shots. You could, of course, use color calibration tools like the X-Rite ColorChecker or a simple gray card, but we won’t be using them in this tutorial.
c) Apply a neutral or flat Profile to the developed photo. In Adobe Lightroom Classic, go to the Basic module, then Profile > Browse, and select the flattest and most linear profile available (for a Nikon D810, use Camera Flat or Camera Neutral).
d) Locate the Lens Corrections module (the name might vary in the software you are using), and in the Profile tab, check the Remove Chromatic Aberration box. Do not alter any other settings.
e) Copy all the development settings from the representative photo to all the other photos. Use the shortcuts CTRL+SHIFT+C to copy and CTRL+SHIFT+V to paste.
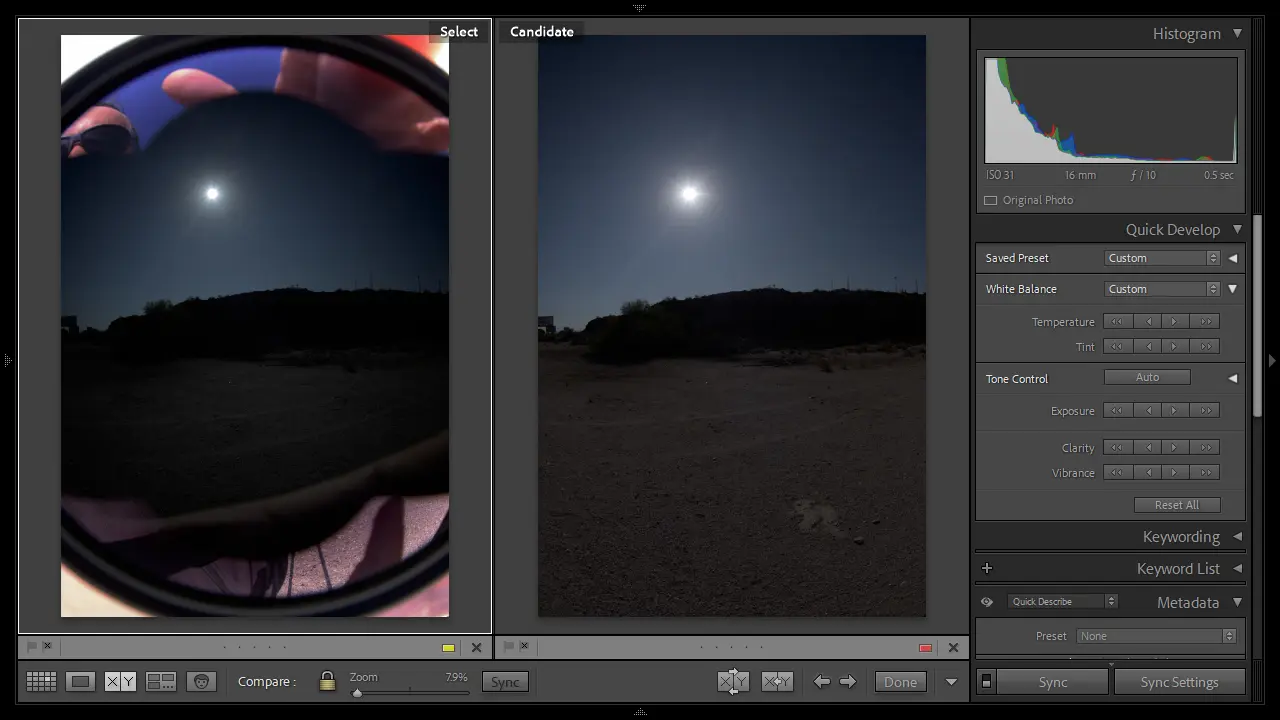
f) Adjust the white balance for shots taken with an ND filter. Tip: use the Compare View in Lightroom. To enable it, select a bright shot taken with an ND filter and a bright image taken without the filter, then press [C] to activate the Compare View mode.
g) Clean photos from the insects, unwanted flares, and sensor dust. Use the Healing (Q) tool in Lightroom for this purpose. To simplify the process, I prefer to temporarily increase the Dehaze value in Lightroom, as the Visualize Spots [A] feature sometimes isn’t as effective as needed. Remember to copy and paste the healing settings to the other photos in each bracketing sequence. Use shortcuts for this: CTRL+SHIFT+C to copy the develop settings, and CTRL+SHIFT+V to paste them. Be efficient and avoid repetitive tasks.
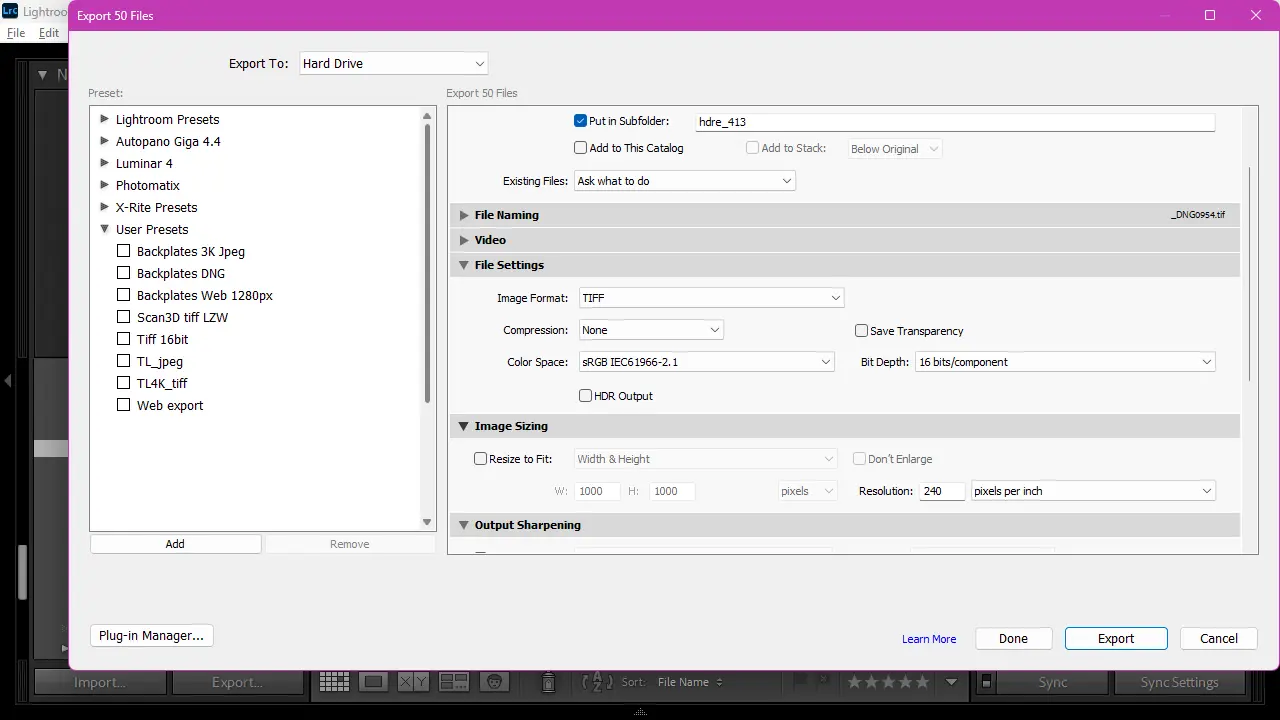
h) Your RAW images are now ready to be exported. Export all files as full-size, uncompressed 16-bit TIFF files to a specified location on your drive.
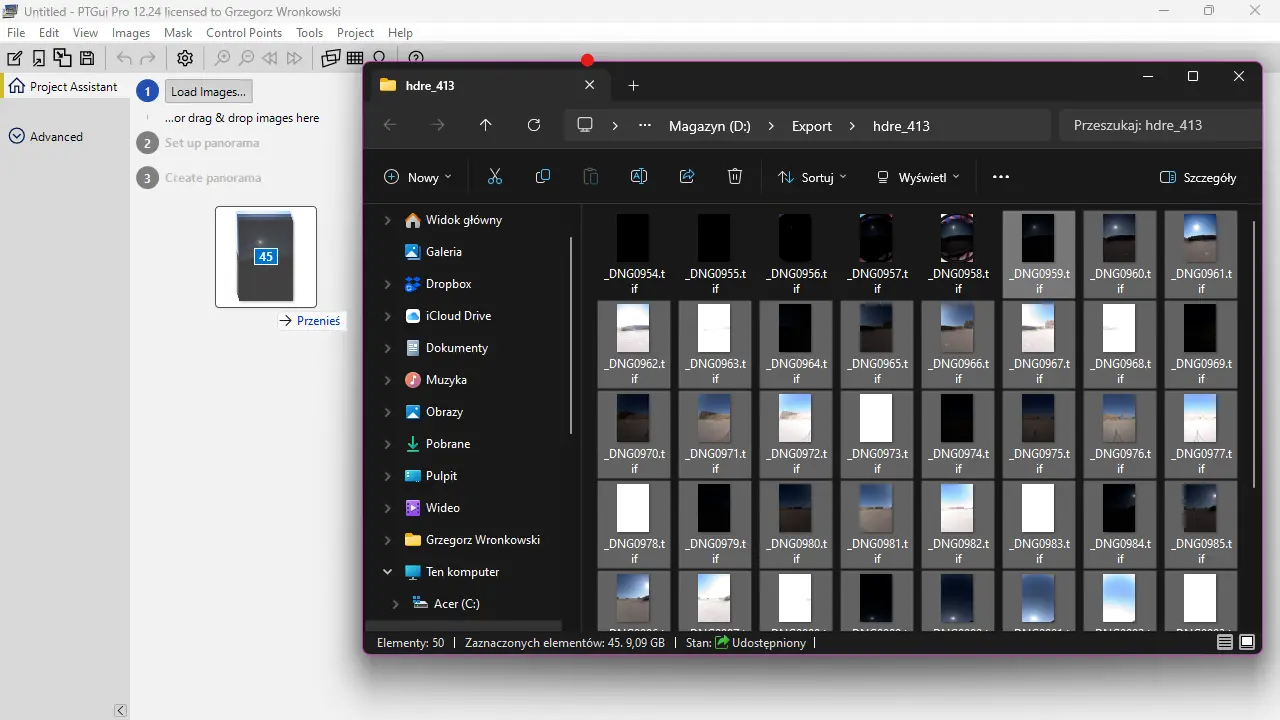
i) Open PTGui Pro and drag & drop all the exported TIFFs (excluding the shots with the ND filter, which we will add later) into PTGui.
j) If you have loaded the correct number of bracketed shots, you should now see an enable HDR mode blue link. If not, something is wrong, and you can’t proceed with the tutorial.
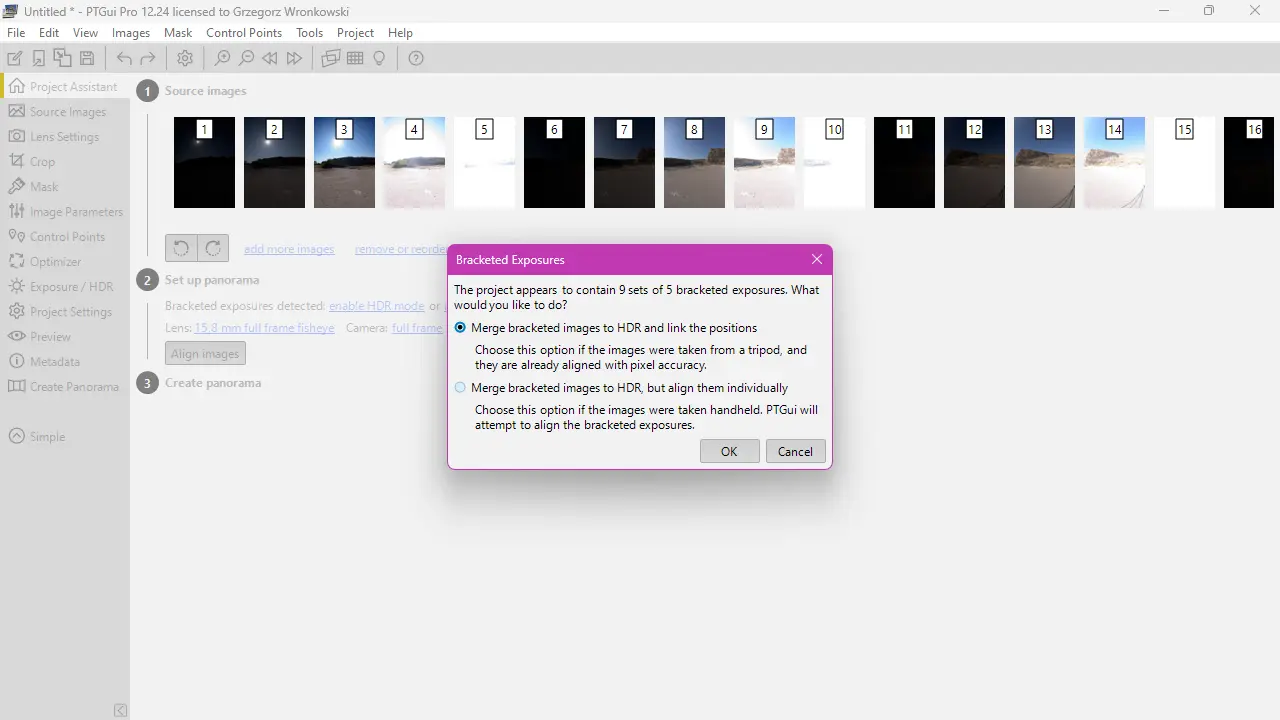
k) Begin panorama detection by clicking the “Align Images” button. A confirmation box should appear, displaying information on Bracketed Exposures with the default option selected. Click OK and wait; it may take 20 seconds or more. Take a deep breath and relax.
l) After a while you should see Panorama Editor with your newly detected panorama.
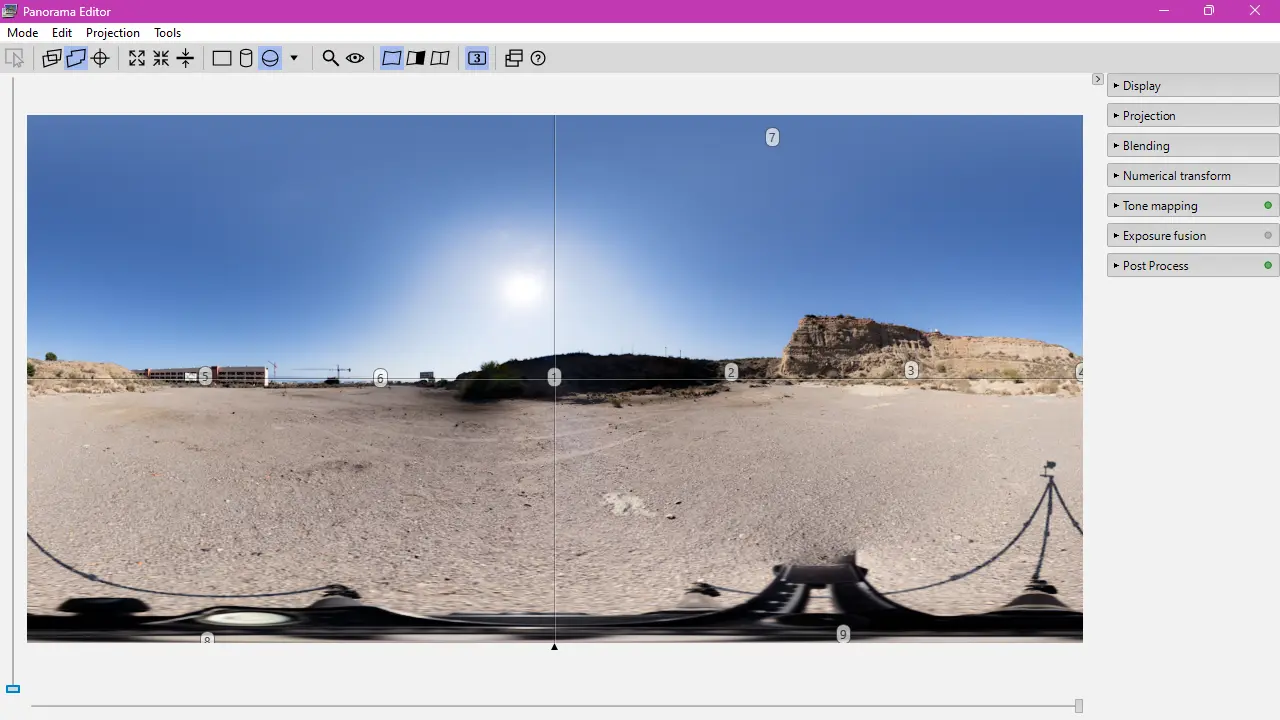
The most common error you might encounter at this step is the sky (nadir) position not being detected, appearing as if it’s incorrectly attached to the ground or side. This occurs quite often with a clear sky. You can easily fix this by selecting the “Edit Individual Images” mode in the Panorama Editor window. Now select the image with the sky, and drag it with the mouse to where it should be. Switch back to the “Edit Panorama” mode and wait a moment. Magic will happen.
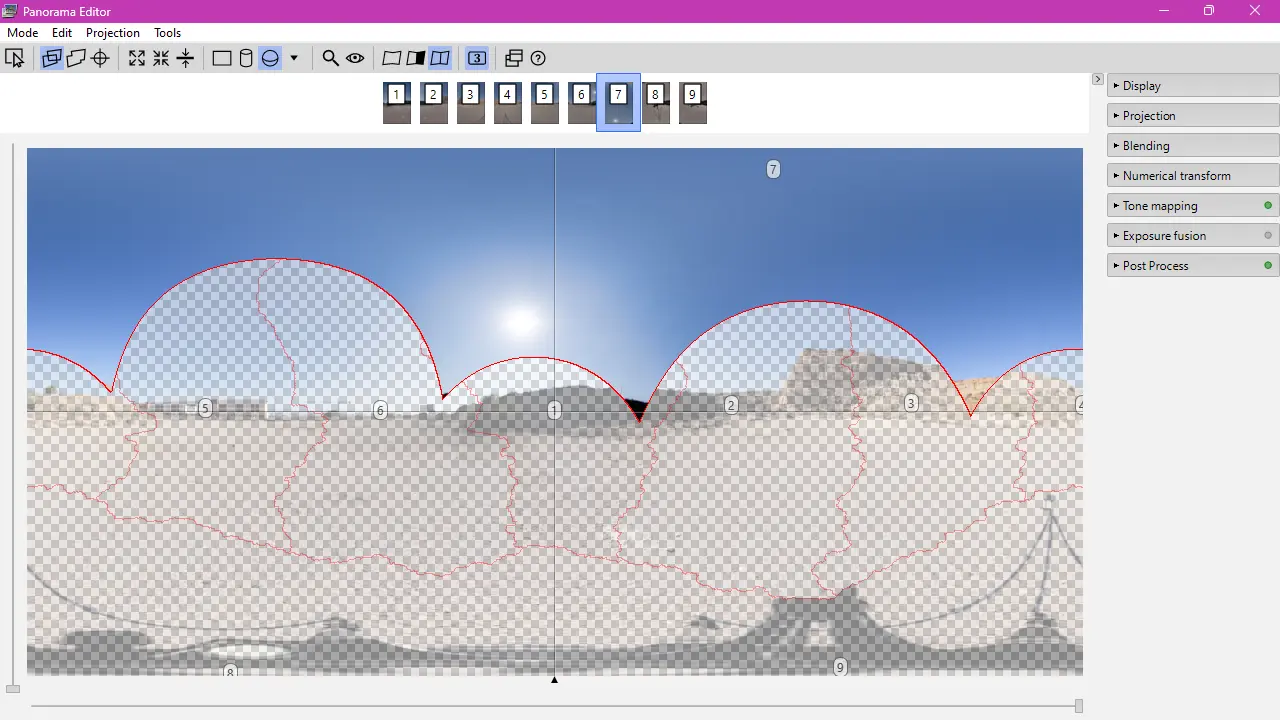
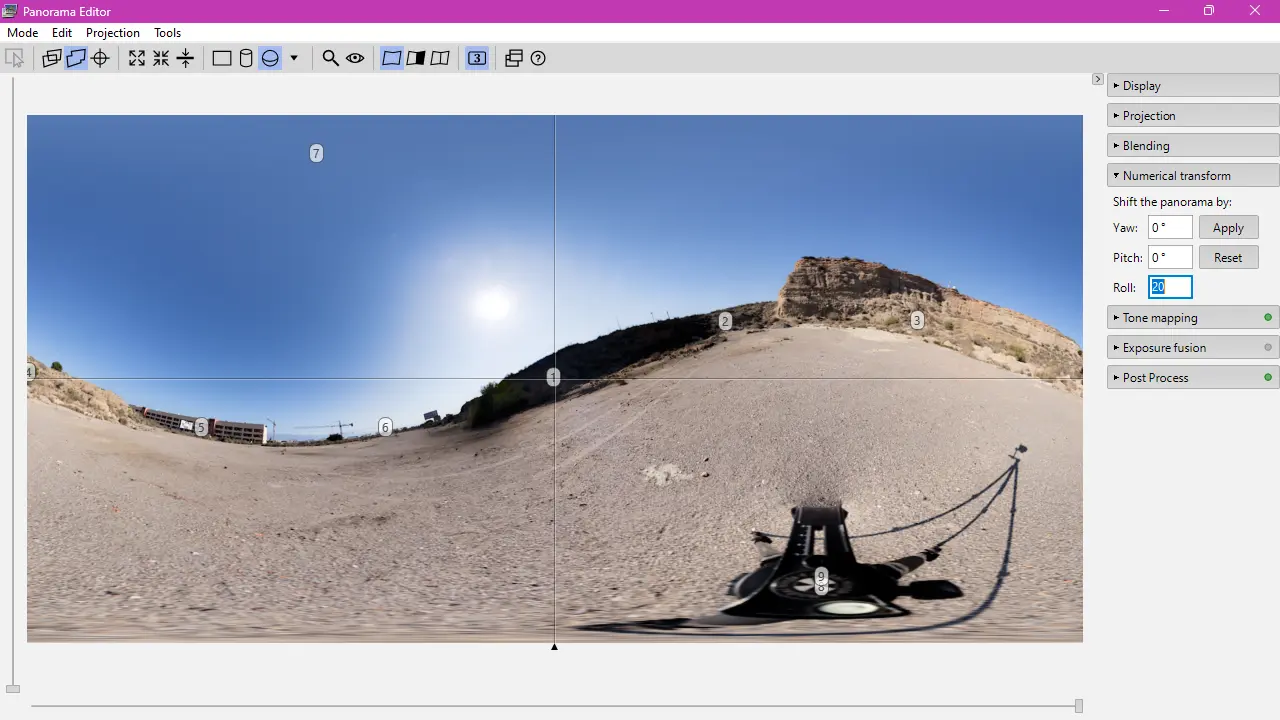
Another very common error occurs when the panorama is twisted and not leveled properly. You can attempt to fix this using the “Straighten Panorama” button at the top, or utilize the “Numerical Transform” option, where “Yaw” shifts the panorama left and right, “Pitch” adjusts it up and down, and “Roll” controls the twisting. Remember that you can also enter negative numbers.
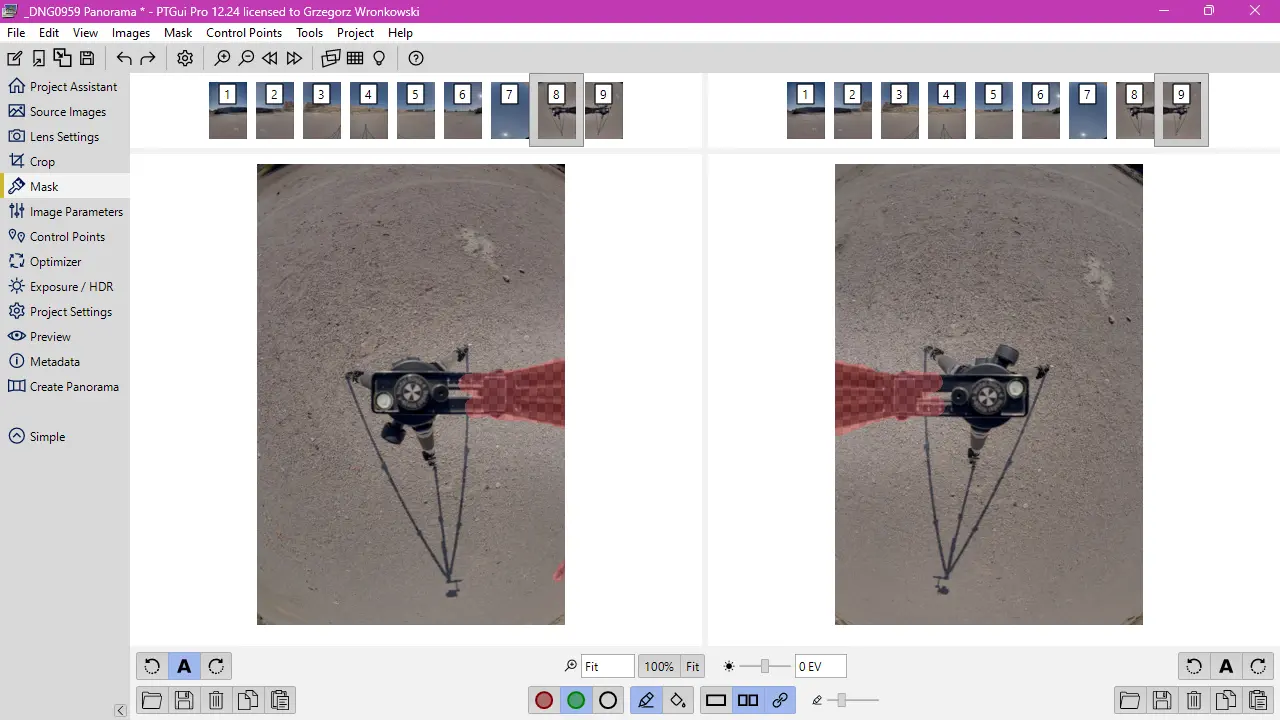
m) When the HDRI panorama’s horizon appears naturally aligned, close the Panorama Editor window and switch to the Mask tab. Select the nadir photos and attempt to mask the tripod and panoramic head. Everything painted with red (shortcut R) will not be visible in the final panorama, and everything painted with green (shortcut G) will be forced to be visible. Use the SHIFT key to paint straight lines. To increase the brush size, use the shortcut K, and to decrease, use L.
After masking nadir shots, open Panorama Editor (shortcut CTRL + E), and use Show the Detail Viewer. Examine panorama for stitching errors (Mouse Wheel to zoom in and out, drag to change perspective).
PTGui is a very advanced program, which is why it’s expensive, and I can’t explain it in detail here. I will provide separate tutorials on Control Points and the Optimizer later on. Now, let’s just continue with our HDRI map.
*Note for the future: At the moment of writing, the latest version of PTGui Pro 13 beta 4 offers a patch tool, but the patch file can only be a 16-bit TIFF file. We need a 32-bit .exr file for the patch, which is why it’s safer to make one using Pano2VR and either Photoshop or Gimp.
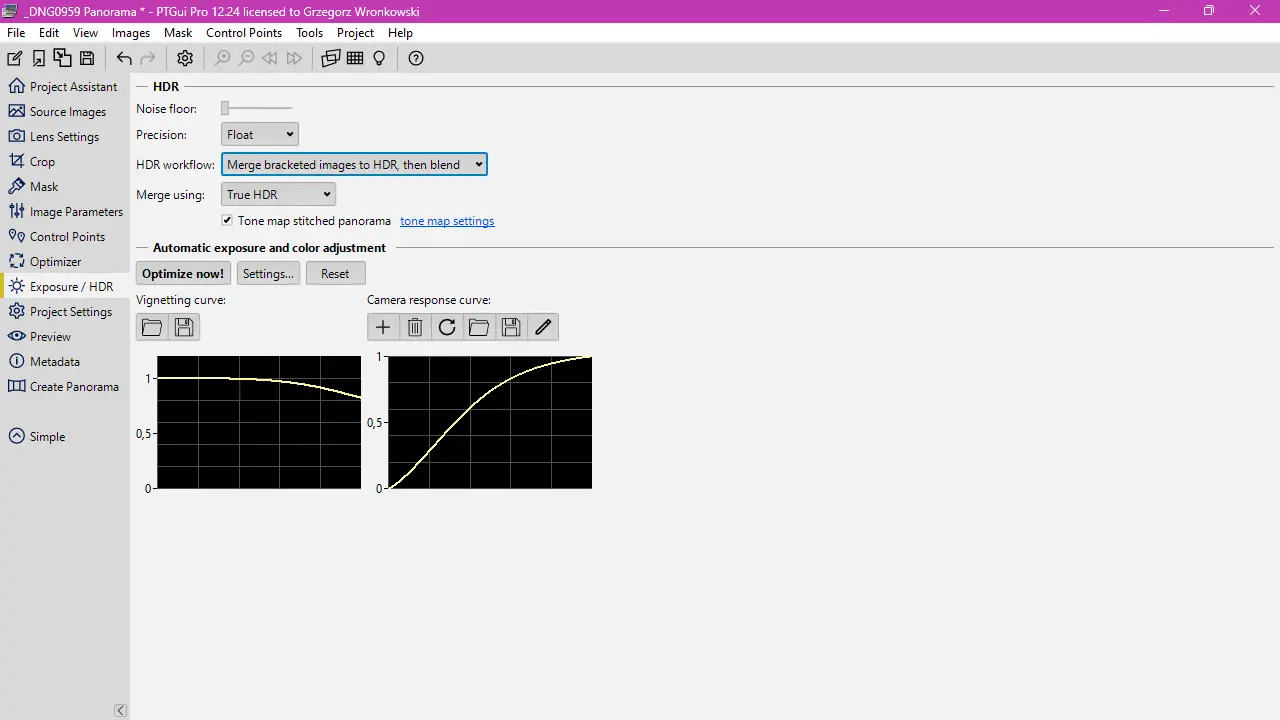
n) Exposure/HDR module – all the most important settings are here. Change the default settings of HDR precision to Float. For the HDR workflow, choose Automatic if you have an RTX Nvidia GPU with more than 10GB of RAM. If you want to render an HDRI map using only the CPU, select “Merge bracketed images to HDR,” then blend.
You can also press “Optimize now!” if the panoramic image does not have an even gradient of the sky.
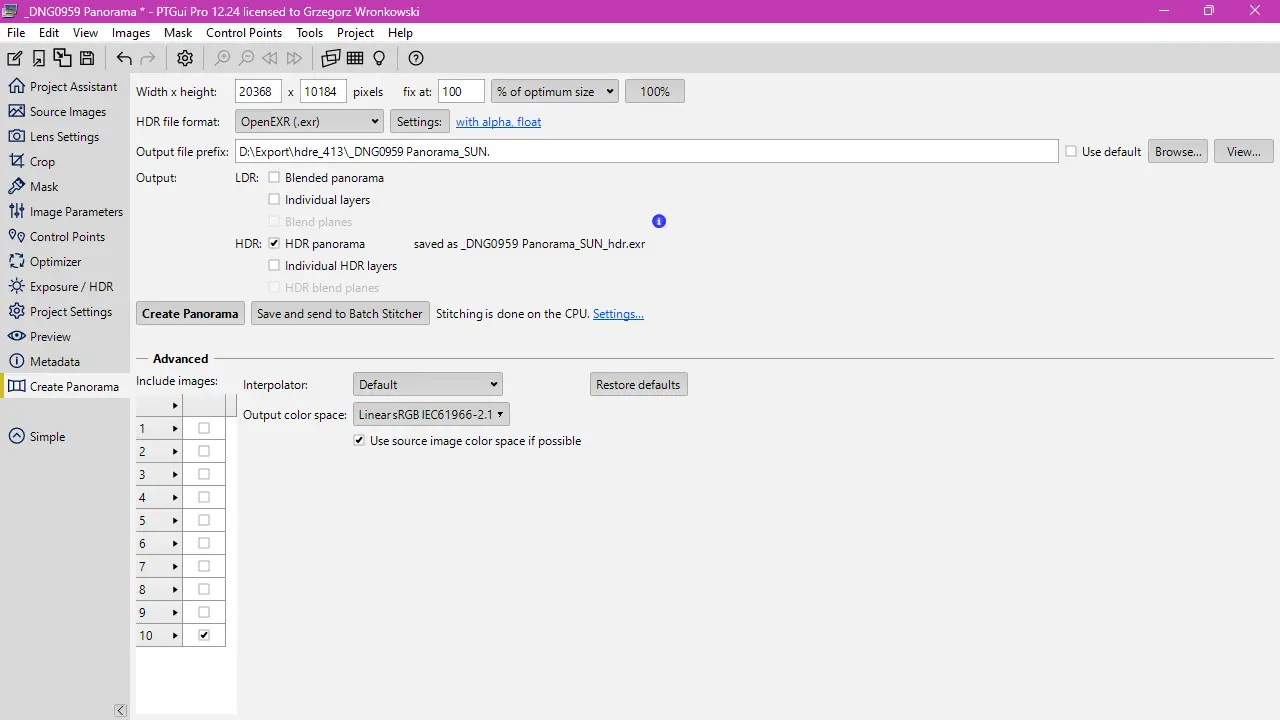
o) Creating hdri map.
Switch to “Create Panorama” module of PTGui, uncheck in Output any LDR files, and at HDR field select HDR Panorama. Go to HDR file format’s settings, and make sure that EXR Options are Bit depth: (32 bits per channel). Leave compression as PIZ and we don’t need alpha channel this time.
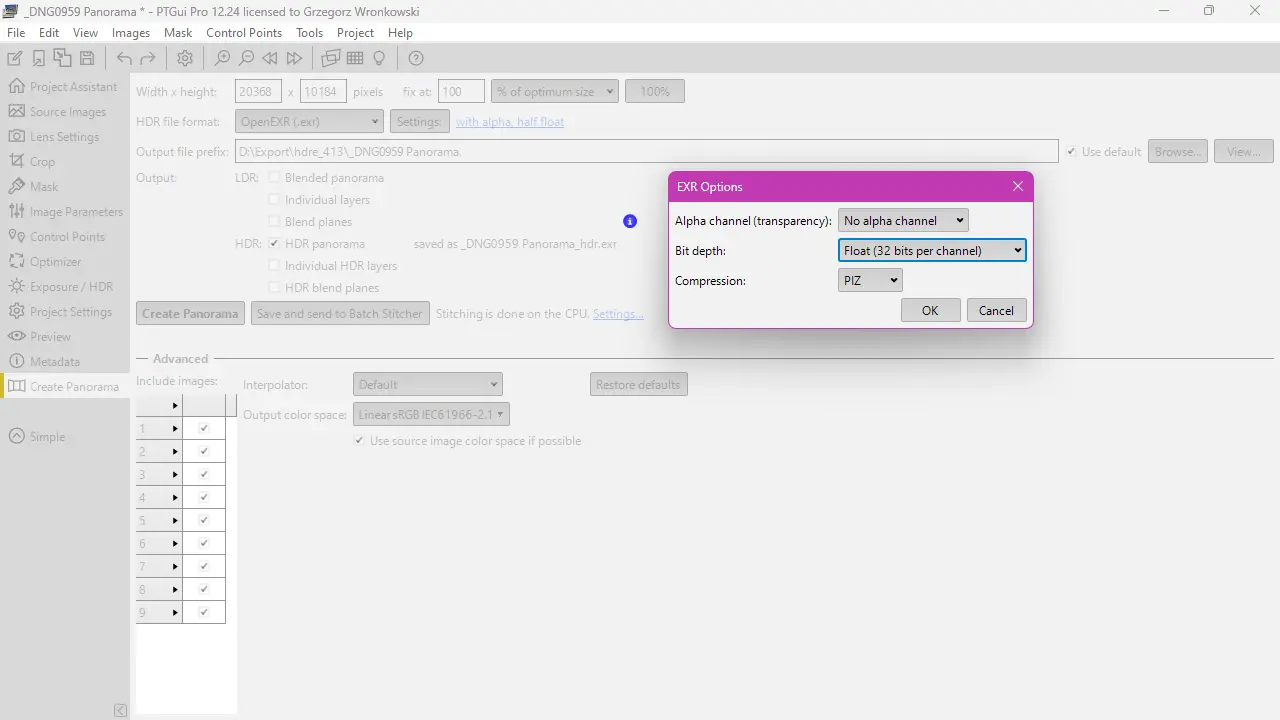
To start hdri map creation, press on Create Panorama button below and wait a few minutes for results. Once created, open it in Photoshop or Affinity Photo or Gimp and check if everything is ok.
p) Now that your HDRI map has been generated, it is time to add extra shots of the sunlight, captured with a neutral density filter. Open the “Source Images” module and drag & drop the exported TIFF images of the sun captured with an ND filter.
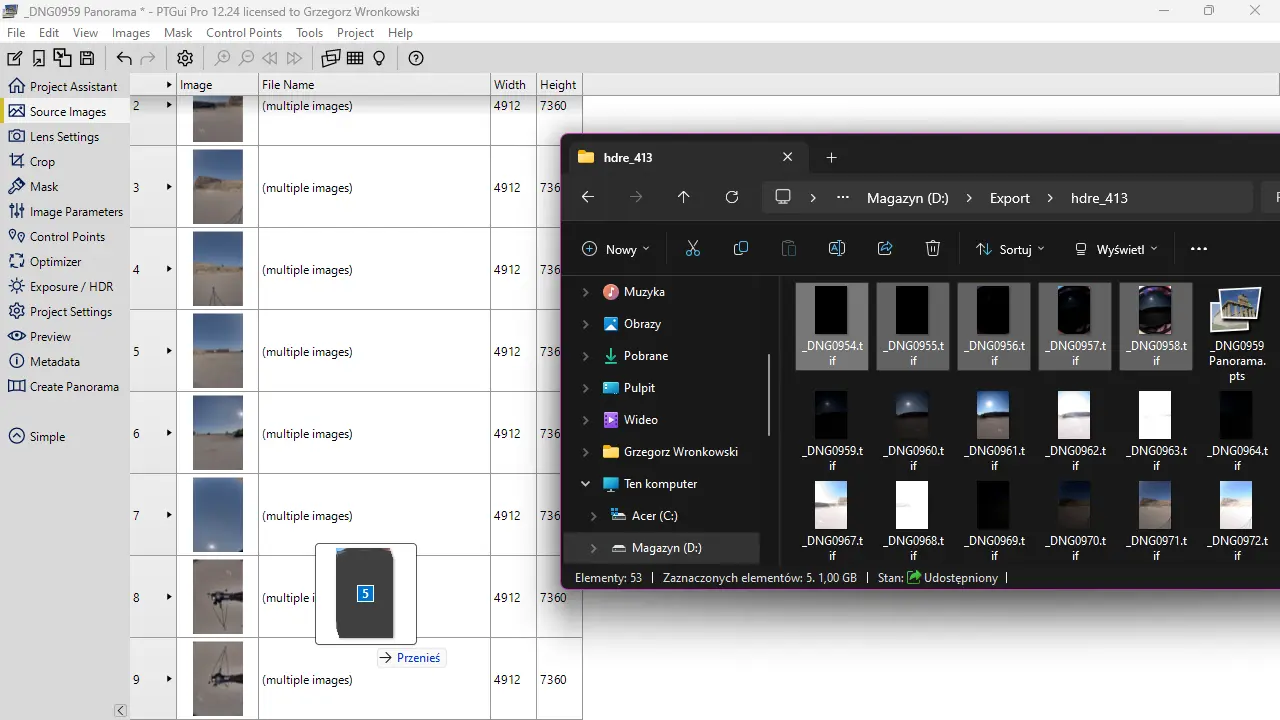
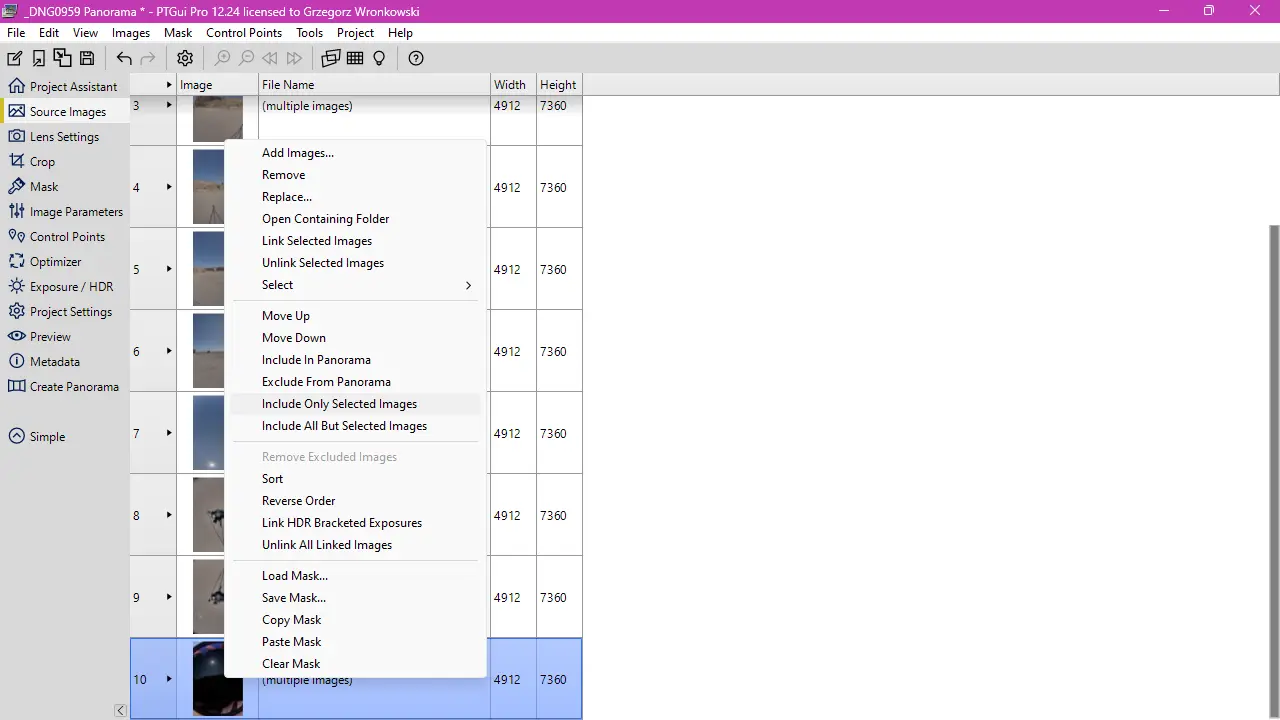
Select added images and RIGHT-CLICK and choose Link Selected Images.

We are going to export only this one shot, so we need to exclude the other images. Select the linked images and right-click once again, then choose: Include Only Selected Images.
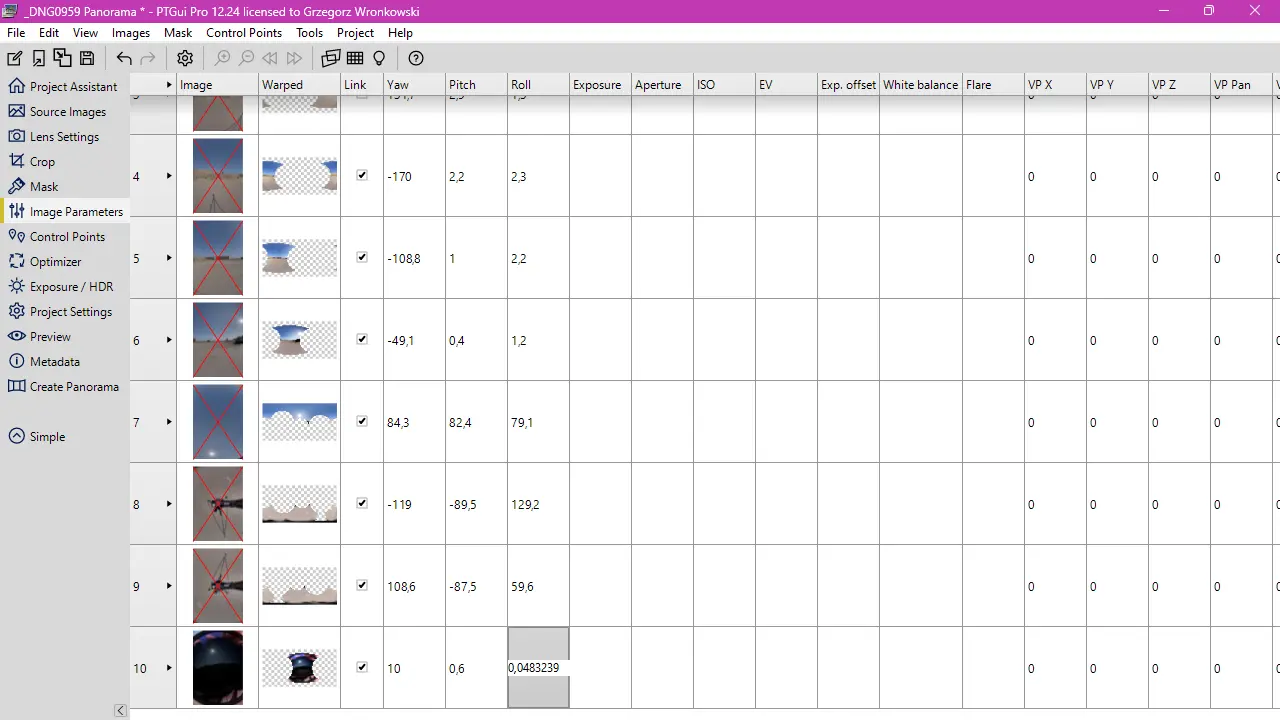
q) Find the Image Parameters module on the left. Look for shots captured in the same position as your extra ND shots. Click on the ‘Yaw,’ ‘Pitch,’ ‘Roll’ fields, and copy and paste those values one by one into the row for the ND filter shots.

r) Switch to the ‘Create Panorama‘ module. Change the output file name (I added “_SUN” at the end of the file name). Also, in the HDR file format settings, change the Alpha Channel to ‘With alpha channel‘. Finally, to render our patch, simply click on ‘Create Panorama‘ and wait. If a prompt window asking for optimization appears, do not optimize.
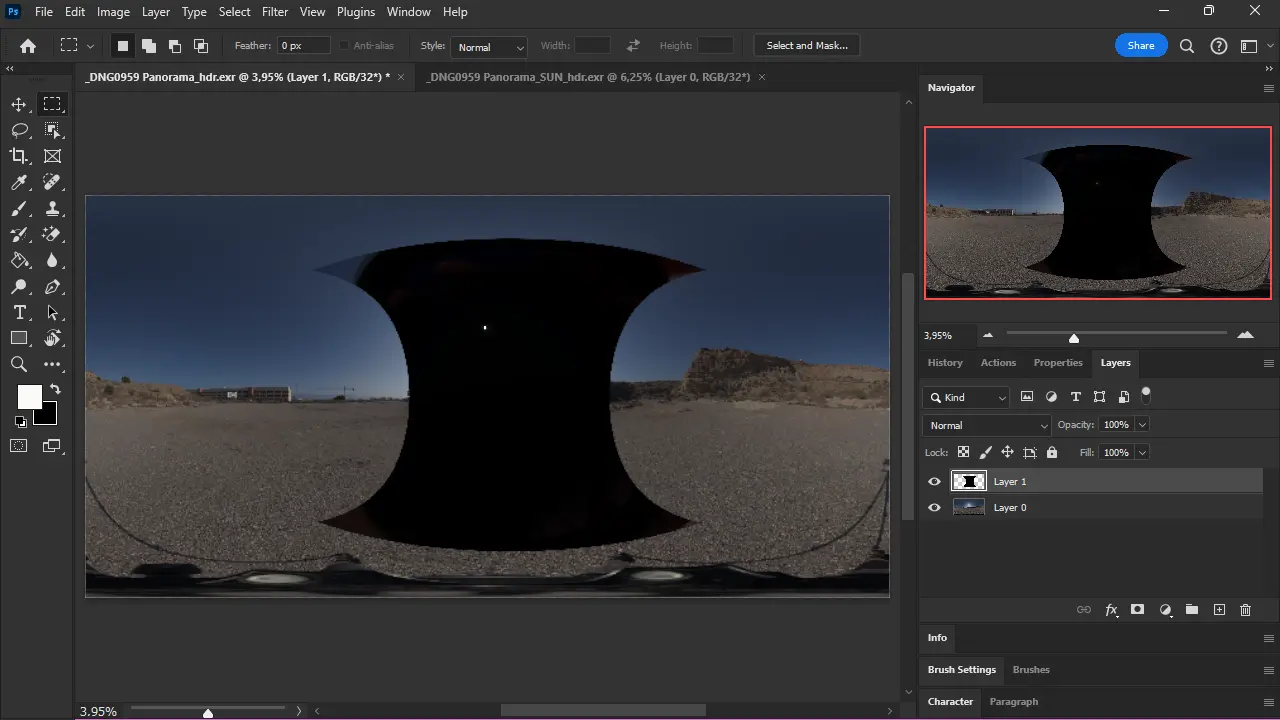
s) We are now going to overlay our _SUN_hdr.exr file patch over a previously exported full spherical HDRI map. I am going to do this in Photoshop, although it doesn’t support full 32-bit OpenEXR. To fix it you’d need to install free plugin EXR-IO. However, you can also accomplish this in GIMP or Affinity Photo.
Open the full spherical HDRI map and the _SUN_hdr.exr file patch in Photoshop. Press CTRL + A to select all in the _SUN_hdr.exr file and then CTRL + C to copy. Switch to the spherical HDRI map file and paste in place – use the shortcut CTRL + SHIFT + V for this
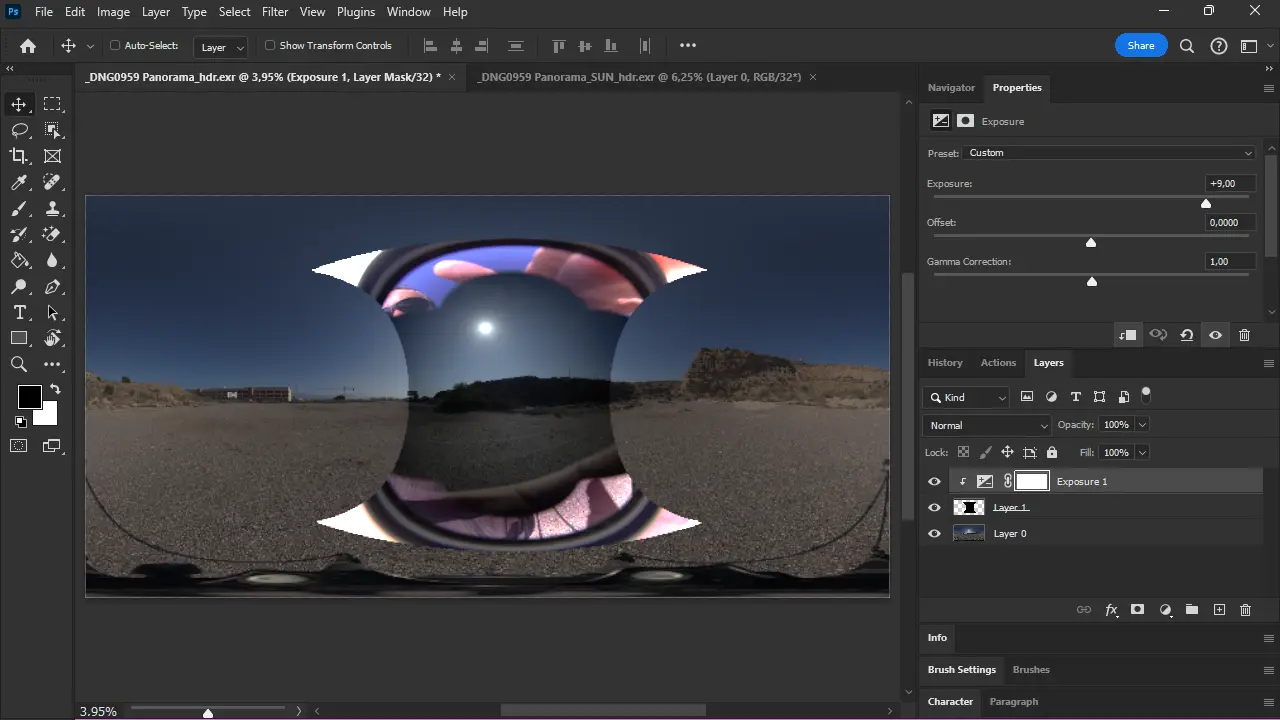
t) Create an Exposure Correction layer and clip it to the patch layer. I used an ND400 filter with the same exposure settings, so I have to enter +9 for Exposure. For an ND1000 filter, it would be +10. For other neutral density filters, check their specifications.
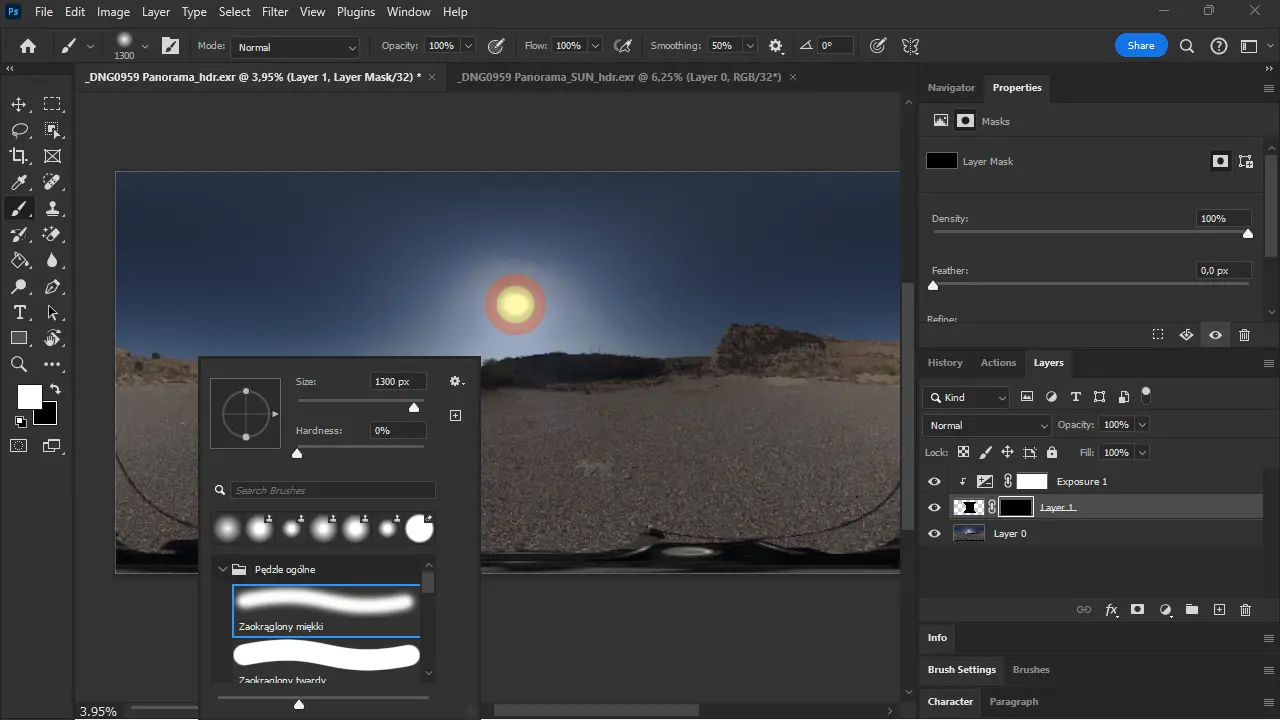
u) Add a layer mask to the patch layer and invert it (shortcut CTRL+I), so it becomes completely black. Use the softest brush and paint over the sun with white color on the mask. Select all layers and merge them (CTRL+E), save it as a new OpenEXR file with Wavelet compression using Exr-IO plugin to preserve 32-bit format.
v) Let’s clean the HDRI map’s nadir shot of the tripod and any unnecessary shadows. To do this, open Pano2VR and drag & drop the HDRI map produced in the latest step. Once it’s loaded, click on ‘Patch Input,’ then ‘New Patch‘, and add a new patch with the ‘+Add‘ button. Rotate to find the part of the image you want to clean in Photoshop, change the format to OpenEXR, and click the ‘Extract‘ button. Wait 20-40 seconds. Don’t close any windows in Pano2VR.
Added in January 2025 – Be careful! I tested output file from Pano2VR, and it looks like that it can destroy your 32-bit linear workflow, instead use Affinity Photo or Flexify 2 plugin for Photoshop to patch nadir!
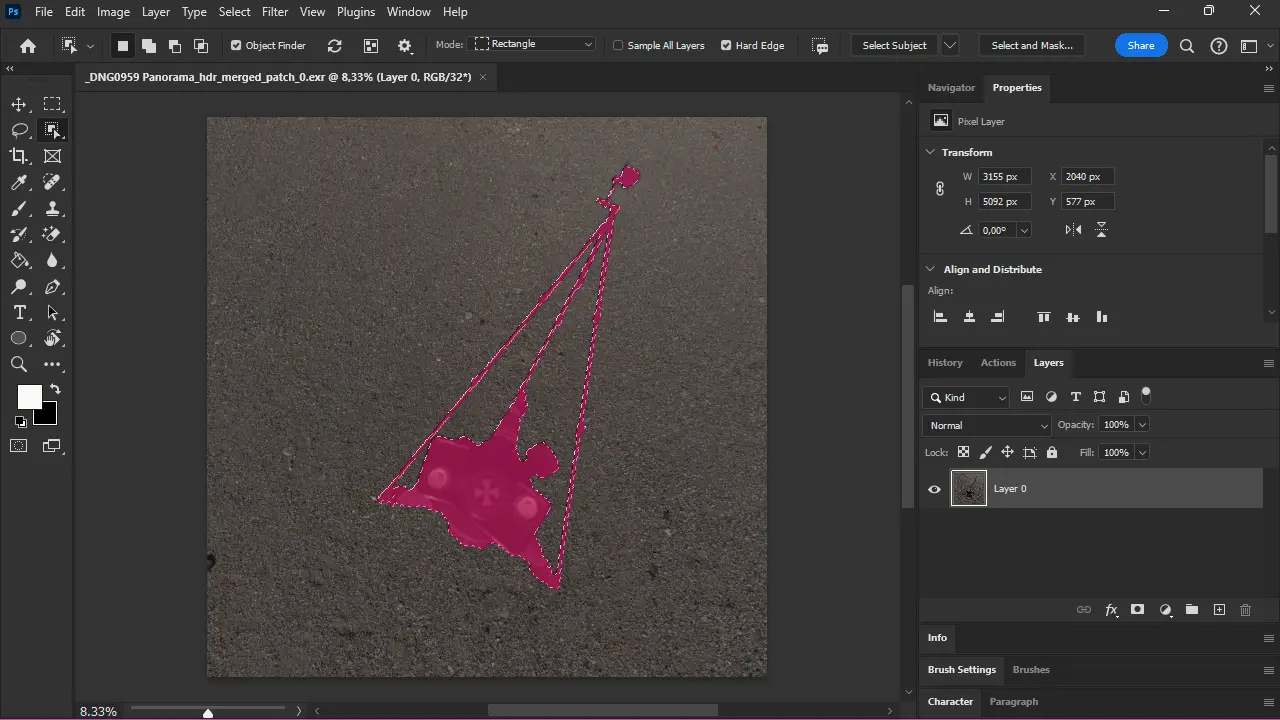
W) Open the newly generated patch file in Photoshop, Gimp or Affinity Photo. You can find it in the source folder, or you might try clicking on the small icon with a blue screen. Clean it in Photoshop using the available tools. Select everything you don’t want to see and use the Content-Aware Fill. Remember, it’s not a perfect tool, so you will likely need to make further adjustments with the Stamp Tool (S).
Use Flexify 2 plugin if you want to patch nadir in Photoshop! Patching nadir with Flexify 2 tutorial is here. Or simply use Affinity Photo‘s Live Projection view. Other option is to use PTGui’s built Convert to cube faces tool, I will cover it later on.
Once finished with editing, re-save patch file (CTRL+S) and switch back to Pano2VR
x) In Pano2VR, with your patch loaded, click ‘OK‘ in the ‘Patch Panorama’ window and confirm with ‘Update Image Patches OK‘. Wait a few seconds. You should now see a preview of your HDRI map with the patch applied.
y) Now, click on the ‘Convert Input‘ button located to the right of the preview and choose Type: Equirectangular, Format: OpenEXR. Finally, click ‘Convert‘ and wait. It’s done – end of tutorial! You’ve just generated your first HDRI map!
z) Look for the newly generated file; it should be in the source directory, with ‘_equi.exr‘ at the end of the filename. Load it into Blender Cycles, V-Ray, Corona, or whichever rendering software and 3D package you use, to find out how it performs! If it’s too bright, lower its exposure in Photoshop and resave. If you don’t like the white balance, you can easily adjust it in Affinity Photo (the white balance correction layer works in 32-bit!) or in Photoshop (though it’s somewhat limited, with only color channels correction).
Thanks for this comprehensive tutorial. It really helps to appreciate HDRI even more. I was far from imagining how tedious their creation process is.
I’d like to take this opportunity to make a personal request: I’m looking for HDRIs of the Cévennes National Park in France (Gard and Lozère départements). Thanks again for a possible lead and best wishes.
osobo [at] osobo.studio