It is a technique used in imaging and photography to reproduce a greater dynamic range of luminosity than what is possible with standard digital imaging.
What does HDRi mean?
HDRi stands for High Dynamic Range Imaging.
It is a technique used in imaging and photography to reproduce a greater dynamic range of luminosity than what is possible with standard digital imaging. In modern times, we can distinguish between two types of HDR photography: artistic which concentrates on the HDR look as a very popular style in photography, and the second one is aimed at professionals to use it as a tool for storing superior tonal range and a way to improve final products like movies, rendering images.
Why use HDRi images?
- because it is a lossless format. Even when you edit 16bit image you still lose some of the data. 32-bit hdri image is lossless by nature, and the most flexible image data format currently available. You can examine it by yourself. Simply open 32 hdri images in Photoshop and lower exposure -4EV, rewrite the file. Next, open it once again and do the opposite, increase exposure +4, as you can see your hdri file stays intact.
- highlight recovery. Imagine you work on RAW files in digital darkroom software (Lightroom, RawTherapee, Studio One). If your image is underexposed or slightly overexposed, you can still recover one or two f-stops with exposure or highlights slider. With HDRI you can recover everything, of course, if it was correctly captured and processed hdri, but let’s leave it for another topic
- color profile autonomous. HDR file holds an entire spectrum of visible colors, regardless of the color profile you do use.
- photographic look while using some camera effects. When working with post-production effects like vignetting, chromatic aberration, lens distortion, blur, glow, very often you will achieve better results on hdri output because you are working not with a flat photo but a linear light, real-world light.
How do you take HDRi photos?
You’d need a photo camera with manual mode available.
Eventually, you can even use your mobile phone, if it only has an option to manually control exposure and white balance. Always shoot in RAW format, if it’s possible, otherwise make sure that your white balance is set correctly, and jpeg quality is set to the highest, avoid compression, use neutral profiles and low sharpening.
1. Shooting
- Find a nice spot for shooting in your area, some nature scenery at dawn or city landscape at the blue hour would be an obvious choice. Use a good quality wide-angle lens. Most fixed lenses are better than cheap zooms.
- Mount your camera on the tripod
- Set ISO to a fixed value, try to keep the lowest iso available, the value of 100 iso should be fine.
- Set aperture to a higher value so the whole picture across the frame is sharp, always try to use f/16-18 if you are dealing with bright, sunny scenes. However, be careful because most lenses reveal awful diffraction effects when shut down. Find a sweet spot.
- Set your shutter speed accordingly. I like to use a histogram to find the best matching exposure
- Check if your camera has an option for bracketed shooting. Canon users can use alternative software called Magic Lantern to unlock some advanced bracketing possibilities. Make sure that your camera in bracketing mode is changing only shutter times while shooting. Aperture (f) value should be fixed during the shooting session.
- Shoot a bracketing sequence of photos. For any modern camera shooting 3-7 photos 2EV apart should be fine. More you take the smoother transitions between colors and less visible color banding. With my old Nikon D800 DSRL, 5 exposures 3 EV apart works for most scenarios, but I need to handle external controller (Promote Pro), for this kind of advanced, not-typical kind of bracketing. It would be just a matter of adding a few lines of code into camera’s firmware…but Nikons firmware is not open for developers. Happy Canon users, Magic Lantern is such an amazing thing.
2. Processing images
Now when you have your bracketed photos, you’d need to transfer files to your drive and process them in so-called “digital darkroom” software.
The most popular and used RAW developing software is Adobe Lightroom, however, you can use any processing software you want. RawTherapee is the best choice if you don’t have any because it’s available for free for Windows, Linux, and MacOS! Be careful – it crashes surprisingly!
- Open any image from sequence and set white balance, turn off sharpening, noise reduction, lower contrast. The image should be flat and neutral as it is only possible. You can reduce chromatic aberrations so you don’t have to use it later on.
- Copy settings from one file to other files.
- Export all files to .tiff 16 bit. Don’t use any compression algorithms as it will slow down an entire process.
3. HDR merge
Now we gonna merge .tif files to HDR. For this, we can use Photoshop, Photomatix, Luminance HDR, Picturenaut. There is so much hdr software that it wouldn’t be even possible to list them all here.
For this quick howTo I recommend you to use Picturenaut, as it is free and easy to understand interface, it is fast, and has good alignment features. Download Picturenaut from here. If you are on MacOS or Linux go with Luminance HDR. For batch hdri processing in HDRi Map workflow, you should use Photomatix or Luminance HDR.
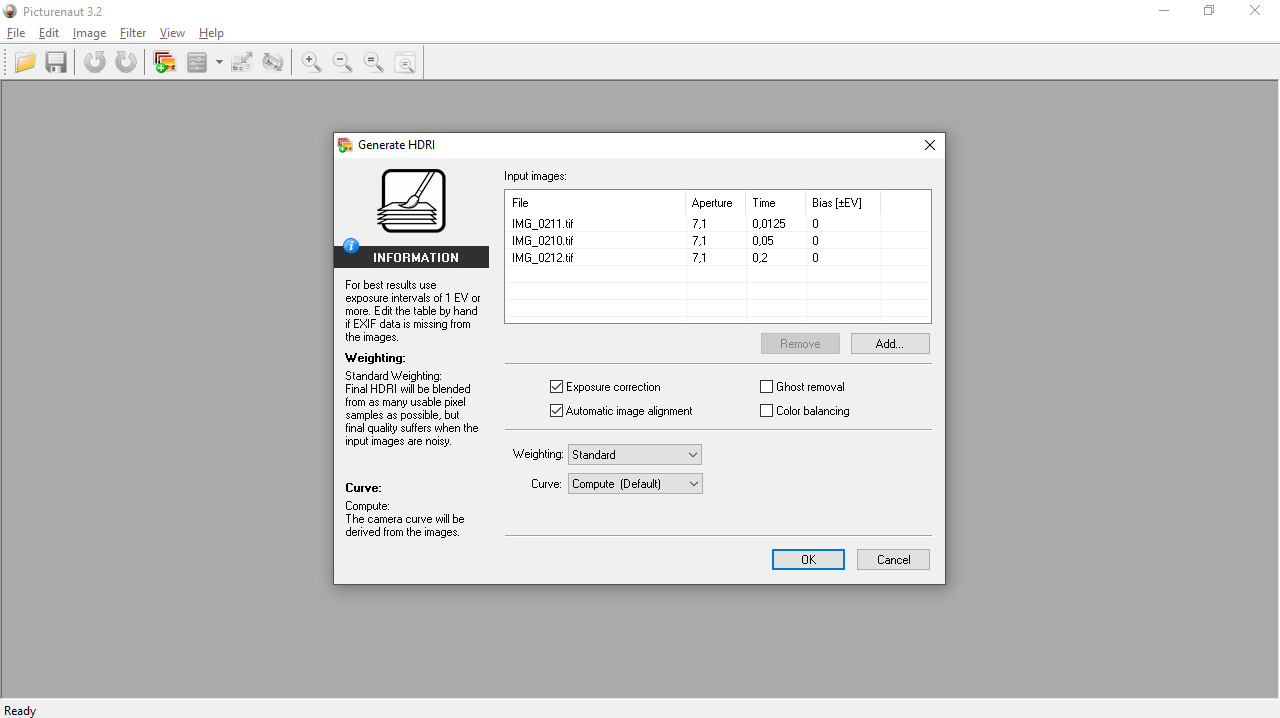
Picturenaut
- Download test source files from here. Unzip it to your drive.
- Drag and drop them on to Picturenaut window. Check Automatic image alignment option. Click OK.
- It’s done. Now you have to save hdr file as .exr. So go to File > Save As choose OpenEXR.
- Now when your hdr file is merged and saved, you can process tonemapping by clicking on Dynamic Compresssion of HDR image icon (shortcut CTRL + t)
OpenEXR is an industry standard container for storing 32-bit hdr images. Don’t use .hdr extension, it is outdated and can not store so much color data as 32-bit .exr
Luminance HDR
- Download test source files from here. Unzip it to your drive.
- Click on New HDR Image icon. Drag and drop test files on window. Select Autoalign images and Auto-crop option. Click Next >
- On new window uncheck Show HDR Preview. Click on Finish button
- You can save your hdr file now. File > Save as choose OpenEXR, or you can continue with tone mapping
How do I convert HDR to jpeg?
Now, presuming that you have your 32-bit .exr file, you want to see it as a fancy, artistic looking 8-bit or 16-bit image. Converting 32-bit hdr file to 8 or 16-bit flat image is called tonemapping.
You can tone map hdr in various available software packages:
- Photoshop (paid, subscription-based) – Photoshop has some great tools for tone mapping. Open .exr file in Photoshop and go to Image > Mode and choose 8bit or 16bit. A new window with HDR toning options will appear. You can choose from available presets, although I recommend you to choose one of the methods: Exposure and Gamma, Highlight Compression, Equalize Histogram, Local Adaptation and tweak it. For natural-looking tonemapping Highlight Compression should work the best. Enhance the final image, add new adjustment layers: Exposure, and S-shaped Curves and save it as .png, .tif or jpeg file.
- Picturenaut (free) – just open .exr or .hdr file in this free software and choose Tonemapping option
- Luminance HDR (free) – Open HDR Image and choose among 15 different tonemapping presets on the right side. You might need to increase Result Size on the left panel because the default resolution is very low. Choose Save As from top menu, and save your file as PNG, tiff or jpeg.
- Photomatix Pro ($99) – Photomatix 6 brings new natural-looking tonemapping algorithms. It works on Windows and MacOS. Recently has arrived also Linux version ($49), but it looks to me like it is still under development, I need to try out this guy one day. There is also PhotomatixCL (from $299) command-line version, which can be used as an automated solution for local and online server-side processing. There are also some other versions of this software, but if you want to be serious in hdr processing go with Photomatix Pro. This is the best and most versatile hdr processing software available on the market. To convert hdr to tonemapped 8-bit or 16-bit image simply drag your hdr file to Photomatix window and choose one of the many available presets, play with sliders to get what you want, and save your final result.
How to preview HDRi image?
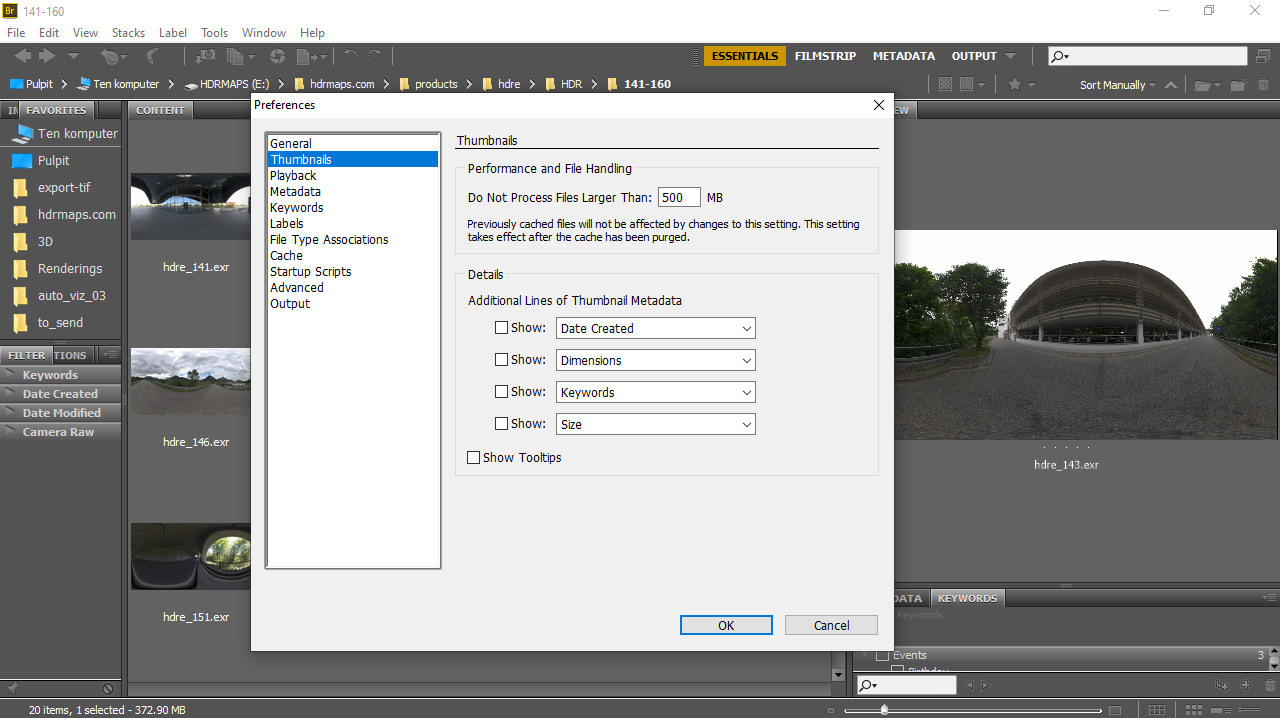
To preview directory with hdri files .exr or .hdr I suggest you use Adobe Bridge, XnView or Blender file browser. Most of the other available software won’t be able to generate thumbnails for large hdri files (20K) and sooner or later will crash. First time when you open a directory full of high-resolution hdri files, Adobe Bridge will try to generate thumbnails of all files within, which can take some time. If you want to speed up the process, move Adobe Bridge caching files to SSD drive, make sure that there is enough free space. If you can’t still see thumbnails for hdri files, go to Preferences (CTRL+K). Find Thumbnails submenu and increase value for Do Not Process Files Larger Than to 500MB or more.